Meals on a Loveseat

Meals on a Loveseat
最新食譜「美味在一起」現已於各大書店及amazon.com有售 "Meals on a Loveseat" is on sale at HK bookstores and at amazon.com now

Pages

Showing posts with label Vermicular. Show all posts

Thursday, November 26, 2015

COOK - 鑄鐵鍋做温泉蛋 Making No-fail Onsen Tamago by Cast Iron Cocotte

蛋:是一樣簡單又複雜的食物。見過一本300多頁厚的書只教做蛋。
今次試用鑄鐵鍋做温泉蛋,1 Take OK,零失敗!

§ 但記住一定要跟足指示用18cm 鑄鐵鍋和註明的特定水量及步驟,要不是不成功不要賴我啊!有朋友就是用了比較大的鍋,然後水未能完全蓋過蛋而不成功,那是不行的噢!


鑄鐵鍋做温泉蛋 (18cm)

蛋 2隻
900ml 水
300ml 冷水

1. 2隻蛋放至室溫。
2. 900ml水放入一 18cm 鑄鐵鍋,用中火燒熱至微微冒煙,水中出現小泡泡。關火。


3. 將300ml 冷水加入鍋中,拌勻令水溫變得一致。
4. 小心放入2隻蛋,輕輕攪拌水使下了蛋的水水溫維持一致。加上鍋蓋。

5. 讓蛋在鍋內靜置15分鐘。取出蛋放在冷水下沖至蛋回愎室溫。
6. 如常地打蛋,出來便是美味的滑滑溫泉蛋。


Making No-fail Onsen Tamago by Cast Iron Cocotte (18cm)

This no-fail method can make you perfect onsen tamagoes by using an cast iron pot

2 Eggs
900ml Water
300ml Cold Water

1. Take 2 eggs back in room temperature
2. In a 18cm pot, fill with 900ml water, over medium heat, cook until small bubbles form, turn off heat
3. Add 300ml cold water to the pot, stir well to make sure the water temperature is uniform. (about 70ºC)
4. Carefully add the 2 eggs, stir the water a bit, cover with lid.
5. Let the eggs stay in the pot for 15 minutes, then take out and rinse in cold water until shells are back in room temperature.
6. Crack the eggs and there is your perfect onsen tamago.


Friday, October 9, 2015

COOK - 韓式安東鷄煲 Andong Jjimdak

實在很愛 One-Pot-Wonder,一煲過不用使用太多用具,沒有聘請"姐姐"的我也不用洗那麼多煲、pan、碗碟。而且吃飯要等齊人,時間運用flexible,預早做好吃時花10分鐘加最後的材料和翻熱便可,方便又能熱辣辣上桌。
如果你雪櫃有洋葱,紅蘿蔔同薯仔,除了可以做常吃的炆牛尾煲,咖喱鷄之外,今次介紹給你另一個一煲搞掂新選擇:韓國大熱《安東鷄煲》,還很補身的啊!


《韓式安東鷄煲》(22cm煲當主食二人份)


雞半隻或雞脾2隻 (切成一口大小,骨可用來餚湯)
1 公升水
6 片薑
1 個全蒜頭 (去衣)
5 粒紅棗 (去核)
5 克木耳 (浸軟,隔水)
3 個新薯 (切半)
1 個紅蘿蔔 (切一口大小)
1 個洋蔥 (切塊)
2 粒紅蔥頭 (去衣)
3 隻韓國青陽辣椒(少辣) (cheongyang gochu) (切片)
100毫升韓國醬油 (ganjang)
2 湯匙韓式糖漿 (mulyeot)
1 湯匙料理酒
2 茶匙蔗糖
100克韓國粉絲(浸軟,隔水)
200克韓國年糕
6 粒白蘑菇 (切1/4)
2 茶匙麻油
白芝麻適量

2 條青蔥 (垂直切約8厘米絲)

1. 於一大鍋,冷水放入雞和薑,開火滾直至白色泡沫浮上面,用勺拿走泡沫。一直以中火多煲15-20分鐘製成雞湯湯底。


2. 加入蒜頭,紅棗,木耳,新薯,紅蘿蔔,洋蔥,紅蔥頭和辣椒, 煮至蔬菜變軟熟透。
3. 準備醬汁。醬油,糖漿,料理酒及蔗糖混合好,倒入鍋內。

4. 放入韓國粉絲及年糕,推入鍋底。

5. 加入白蘑菇,繼續滾煮5分鐘。


6. 灑上麻油,白芝麻和青蔥絲上桌。


Andong Jjimdak (Serves 2 as Main using a 22cm pot)

2 Chicken Thighs or a Half Chicken (cut into bite-sized pieces)
1L Water
6 slices ginger
1 whole garlic (crushed)
5 red dates (deseeded)
5g black fungus (soaked and softened, drain)
3 new potatoes (halved)
1 carrot (sliced)
1 onion (sliced into bite-sized pieces)
2 shallots (peeled)
3 Korean green chilis (cheongyang gochu) (sliced)
100ml Korean soy sauce (ganjang)
2 tbsp Korean corn syrup (mulyeot)
1 tbsp cooking wine
2 tsp brown sugar
100g Korean glass noodles (Dang Myun) (soaked and softened, drain)
200g Korean rice cakes
6 white mushrooms (cut into bite size chunks)
2 tsp sesame oil
White sesame seeds
2 stalks green onion (cut lengthwise thinly and soak in cold water, drain)

1. In a pot, put chicken, cold water and ginger. Turn on heat and boil until white foam floats, skim off the form and boil for 15-20 minutes and becomes chicken stock.
2. Add garlic, red dates, black fungus, potatoes, carrot, onion, shallots and chili to the soup and boil until vegetables softened.
3. Prepare the sauce. Mix soy sauce, corn syrup, cooking wine and brown sugar, pour into the pot.
4. Add soaked glass noodles and rice cakes, stuff them at the bottom of the pot. Add mushrooms, let boil for 5 minutes.
5. Sprinkle sesame oil and sesame seeds, garnish with green onion and more chilis if you like.


Tuesday, September 22, 2015

COOK - 用鑄鐵鍋也做到的慢煮烤羊鞍 Slow-cook Rack of Lamb with Pear Chutney

我知道近年很流行慢煮棒。。。
我知道做慢煮有慢煮棒很方便。。。
但。
我地方真的不夠用,價錢實在不便宜,而且真的不想投資在一個只得單一功能的工具上

可是,想做慢煮時怎麼辦呢?我發現一個鑄鐵鍋除了日常煎煮炆外都可做到慢煮的功能!
今次的實驗是試做一道慢煮烤羊,而且棄用常配的迷迭香改用乾牛至,結果效果一流,ご主人說有比高級酒店的更好吃,而且同等價錢,份量是街外吃的4倍!很化算又美味,在開Pot Luck Party時如果做這道菜,一定會得到朋友的讚許。試一下吧!


慢煮烤

  2排(16支骨)
海鹽  適量
鮮磨黑胡椒    適量
蒜茸  4瓣 (切茸)
乾牛至 (Oregano)適量
月桂葉  4-5塊
橄欖油  適量
黃芥辣  適量
麵包糠  4湯匙
乾芫荽  適量

Slow-cook Rack of Lamb with Pear Chutney
Frenched Rack of Lamb (16 bones)
Sea Salt
Ground Pepper
4 Cloves Garlic (minced)
Oregano
4-5 Bay Leaves
Olive Oil
Yellow Mustard
4 tbsp Bread Crumbs 
Dried Parsley


1. 海鹽,鮮磨黑胡椒,蒜茸及乾牛至均勻地塗抹表面,放上月桂葉並灑上橄欖油醃好。
Marinate the rack of lamb with sea salt, freshly grounded pepper, minced garlic and dried oregano. Place the bay leaves on top and sprinkle with olive oil.

2. 將放入真空袋或密實袋內,盡量壓走多餘的空氣。
Place the lamb in a vacuum sealed bag or a zip-up bag, try to squeeze as much air out of the bag as possible.

3. 鑄鐵鍋煲約1.2公升水至開始冒煙,水有泡泡。關火。
In a cast iron pot, boil 1.2L of water until it steams and bubbles, turn off heat.

4. 注入200毫升冷水令水溫下降。
Add 200ml of cold water to reduce the temperature.

5. 將放入水中,確保水能蓋過肉的表面,需要時可放重物壓著。
Place the lamb into the water, making sure that the water can cover the surface of the meat.

6. 蓋上煲蓋,不要再打開。煲用布包著,再放入保溫袋內。
Cover with the lid and do not open it until it's ready. wrap with a cloth and place the whole cast iron pot in the heat keeper.

7. 讓煲在保溫袋內靜置2小時,中途不要打開喔!
Let the pot sits in the heat keeper for 2 hours, do not open it while it's doing the work!

8. 2小時後將取出,棄掉月桂葉。在表面均勻地塗抹一層黃芥辣。
After 2 hours, take the rack of lamb out from the zip-up bag, discard the bay leave. Smear the surface with a thin layer of mustard.

9. 麵包糠加入2湯匙的橄欖油拌勻。
Meanwhile, add 2 tbsp of olive oil to the bread crumbs and mix well.

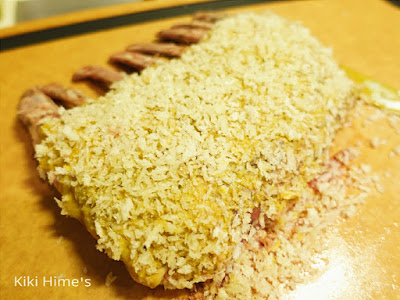
10. 將麵包糠灑在塗了黃芥辣的一面,再搖走多餘的碎。在表面灑上一點乾芫荽。
Sprinkle bread crumbs onto the surface with mustard, shake the excess crumbs, add a bit of dried parley on top.

11. 氣炸鍋預熱200ºC,溫度夠的時候將羊架放入烤8分鐘。如用焗爐可試200ºC 10-12分鐘,當然焗爐不同類別,大小或品牌溫度都有所差異,請自行調節。
Preheat Airfryer to 200ºC, cook the lamb for 8 minutes. If you are using an oven, try 200ºC for 10-12 minutes. (As oven's size, type and brand varies in actual temperature, do adjust yourself accordingly)


12. 烤好後等約5分鐘令肉汁吸收才上碟。

Once cooked, let the rack rest for 5 minutes to absorb its own juice, then serve.


另外我這次用了雪梨渣跟一點薑和紅椒粉和蔗糖煮了這個Pear Chutney,跟羊扒一起吃很配呢!不用那麼悶每次也用薄荷啫喱吧。
I made a Pear Chutney with some ginger, paprika and cane sugar as condiment, it compliments the lamb just right, a new variety than the usual mint jelly.

切開來,剛好的熟度,還很juicy,酥脆中帶點微微騷香,實驗很成功呢!
As you can see the cut rack, it's cooked perfectly and tender and juicy inside, while you can enjoy a crispy crust outside.


Sunday, July 26, 2015

COOK - Vermicular琺瑯鑄鐵鍋試用報告(2015年11月9日更新)

毒毒毒!容易中毒者慎入!

香港終於有得賣Vermicular 琺瑯鑄鐵鍋喇!唔駛特登去日本托返來,又唔駛搵台灣代購擔心運費了!


一直都知道很多人是Vermicular的粉絲全因為它的閃閃鍋身和粉色系列。
我個人來說是比較喜歡monotone,黑白灰藍最適合我,但既然粉色這麼出色,我也凑熱鬧選了一個粉藍色的。真身真的很美,散發著細碎的閃光,而且整個鍋不是單一的粉藍色,接近底部的位置是漸變淺藍色的,更顯上色方面是很花心思的。

煲蓋內部和Staub一樣有點點突紋,加強保濕效果。

鍋底設計有凸出坑紋,很適合做先煎香(searing)再炆燉的菜式。
我試用了它來做了searing,發覺加熱很快,只用了1-2分鐘便燒熱油了。

雙把手設計十分適合手形,也能分散重量,可想像職人對女性的體貼。另外,我發覺煲蓋與煲身之間沒有很多虛位,能全面地鎖住蒸氣,令食材能保持鮮味。

忍不住立刻試煲,做了一道 Beef Cheek Ragout 紅酒炆牛頰肉,食譜請按這裡
蓋上煲蓋小火炆了3小時,中途沒打開,然後只是少了1cm的水,鎖水功能果然厲害!

最後是清洗狀況。有一點黏底,可是情況不嚴重,只需用熱水和海棉刷刷,污跡便除掉。

說一下壞處,就是太方便可買得到了,只要上網按幾個掣,免費運送,2天就宅急便上門。這樣我會不會又太容易越買越多呢?另外,香港暫時不設刻名服務。

總的來說,我對這個Vermicular琺瑯鑄鐵鍋是相當滿意的,尤其鎖水功能,它有可能成為我的新寵。下次,我可能還是想要黑色和白色,還是灰色好呢?

新消息,香港Vermicular官網由11月6日起開始推出刻名服務了!快點order一個自己專屬,獨一無二的鑄鐵鍋吧!(鑄名服務只適用於18cm和22cm)

香港Vermicular Facebook Page: https://facebook.com/vermicular.hk
香港Vermicular 官網 2015年7月31日正式啓用:www.vermicular.hk
官網上會有介紹並有其他產品包括煲,隔熱手套,木墊,咖哩醬,圍裙,保溫煮食袋等。全香港免費運送,付款方面可用信用卡,paypal及銀行過數,無手續費。