Meals on a Loveseat

Meals on a Loveseat
最新食譜「美味在一起」現已於各大書店及amazon.com有售 "Meals on a Loveseat" is on sale at HK bookstores and at amazon.com now

Pages

Showing posts with label COOK. Show all posts

Saturday, March 11, 2017

COOK - 海南雞飯 Hainan Chicken Rice


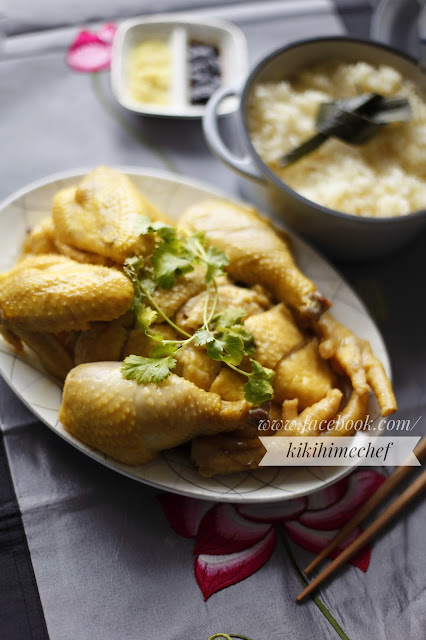
海南雞飯真的是源自中國海南,而非現在大家以為的新加坡或馬來西亞,只是因在二十世紀初隨著移民潮而在東南亞地區發揚光大。海南雞飯之所以好吃是因海南文昌市的雞是吃椰子作糧,所以文昌雞是那麼有名,好吃的。這次分享一下我用無水蒸的方法製作海南雞,未必是最正宗,但保証又香又好吃。


Hainan Chicken Rice (海南雞飯) 22cm + 14cm cast iron pot

海南雞
鮮雞 1
適量
薑汁 2湯匙
花椒 1茶匙
八角 3
斑蘭葉 3
南薑 3
50毫升

油飯
椰子油 1茶匙
蒜頭 1 (切茸)
200
蒸雞水 220毫升
1茶匙
斑蘭葉 1 (打結)

1. 雞洗淨抹乾切去雞肥(雞肥留下作製作薑茸用),以鹽、薑汁、花椒、八角擦在雞內外,另把一片斑蘭葉和南薑放入雞腔中醃30分鐘。
2. 22厘米鑄鐵鍋底部先放入餘下的斑蘭葉,再放入雞和水,蓋上鍋蓋以中火加熱至煲邊冒煙轉為小火,蒸35分鐘。
3. 把雞取出放入冰水浸10分鐘至涼,隔水,斬雞。另煲內剩下的蒸雞水留起220毫升,不夠可加清水。
4. 14厘米鑄鐵鍋內用椰子油把蒜茸炒香,加入米、蒸雞水、鹽和斑蘭葉,以中火加熱至煲邊冒煙轉為小火,煮12分鐘,再焗12分鐘


一般海南雞會配以薑茸,老抽和蒜茸辣椒醬食,但海南人則會配「十點醬」吃。
薑茸
5克薑去皮磨茸,加入燒熱雞油即成。

老抽
老抽2湯匙和糖2茶匙煮熱至微稠放涼。

蒜茸辣椒醬
3瓣蒜頭,2隻辣椒和1茶匙羅望子醬放入攪拌機打成茸即成。

海南「十點醬」是微帶酸甜的醬料
蒜頭1瓣切茸用油爆香,混合3克薑去皮磨茸,蔥花少許,豉油和一小撮鹽和青檸汁製成。


Tuesday, June 7, 2016

COOK - 潮州香煎水瓜烙 Chiu Chow Style Melon Pizza

每次去潮州打冷,除了吃鹵水鵝之外,我最愛就是水瓜烙。比起煎蠔烙,水瓜烙沒那麼膩,清甜中帶點黏黏的口感更得我歡心。偶然買到水瓜,便立刻自己試做水瓜烙,不論口感和味道都跟潮州舖的一樣呢,太成功了!


《潮州香煎水瓜烙》

水瓜1條 (去皮前 290克, 去皮後約250克)
番薯粉 50克
水 2湯匙
魚露 2茶匙
蛋 2隻 (買到鴨蛋更好)
花生碎
芫荽

1. 水瓜去皮切條
2. 一大碗內放入番薯粉和水拌勻,加入魚露和蛋拌好,放入水瓜條。
3. 平底易潔鍋燒熱油,將水瓜倒入搖勻,以中火煎約5分鐘或至金黃色,反轉面再煎4分鐘。
4. 上碟加上花生碎和芫荽,表面再灑一點魚露,有需要時可點魚露伴吃。


Sunday, April 24, 2016

COOK - 韭王肉絲兩面黃 Pork and Chinese Chives on Crispy Noodles


《韭王肉絲兩面黃》

瘦肉  100g (切絲)
鹽  1/2茶匙
糖  1/2茶匙
白胡椒粉  少許
麻油  1茶匙
豆粉  2茶匙
水  1湯匙

炒麵用全蛋麵  1餅 (在粉麵店有售)
白醋  1湯匙
韭王  1大束 (切4cm段)
雞湯  250ml
馬蹄粉  2茶匙
水  1湯匙

1. 瘦肉切絲,用鹽,糖,白胡椒粉,麻油,豆粉和水略醃。
2. 煮滾一湯鍋的水,加入白醋,放入麵餅煮散,至水再次沸騰關火,把麵隔去水份備用。(加入醋可洗走麵內多餘的鹼水味)
3. 把馬蹄粉和水混合在一小碗內備用。
4. AF預熱180ºC 3分鐘,在烤盤內噴油,放入麵餅,表面再噴油,180ºC 6分鐘。
5. 另一湯鍋內煮滾雞湯,加入瘦肉和韭王煮滾。再拌入馬蹄粉水煲至湯汁杰身。
6. 麵餅放在碟上,將雞湯及料淋上表面。


《Pork and Chinese Chives on Crispy Noodles》

100g Pork (thinly sliced)
1/2 tsp Salt
1/2 tsp Sugar
A little grounded white pepper
1 tsp sesame oil
2 tsp Corn Starch
1 tbsp Water

1 Chinese Egg Noodles
1 tbsp White Vinegar
1 bunch of Chinese Chives (Cut into 4cm length)
250ml Chicken Stock
2 tsp Water Chestnut Flour
1 tbsp Water

1. Marinate the sliced pork with salt, sugar, white pepper, sesame oil, corn starch and water. 
2. Boil a pot of water, add white vinegar, add the noodles and cook until the water boils again. Drain and set aside. 
3. Mix the water chestnut flour and water in a small bowl. 
4. Pre-heat AF to 180ºC for 3 minutes. Spray oil to txhe pan, add the noodles, and spray more oil on the surface of the noodles. Cook at 180ºC for 6 minutes.
5. In a stock pot, boil the chicken stock, add pork and Chinese chives. Once it's boiling, add the water chestnut flour mix to thicken the stock. 
6. Serve the noodles on a plate, pour hot chicken stock on top, and you can enjoy an authentic Chinese noodle dish with two textures in one mouthful.


Monday, March 7, 2016

COOK - 麻香辣口水雞 Sichuan Spicy Chicken

ご主人出去工幹,從越南買來一大袋辣椒,放在雪櫃一直未想到怎麼用好。剛巧買了一隻走地雞,天氣又潮濕,靈機一觸便想到做一道口水雞,消耗一下那一大袋辣椒。其實我也是憑味覺記憶來做這道菜,想不到很對味還辣到飛起。


麻香辣口水雞

走地雞  1隻
小辣椒  10+隻 (切粒)
花椒  1茶匙
蔬菜油  60ml
麻油  1湯匙
黃糖  1茶匙
醬油  3湯匙
蒜頭  3瓣 (切碎)
芝麻  1湯匙
芫荽  1束 (取葉,撕碎)

1. 走地雞隔水蒸熟,約30分鐘。放涼,去骨切件放上碟。
2. 準備一隻鑊,燒熱放入辣椒,花椒,蔬菜油及麻油,以中小火煮至變成辣椒油。
3. 關火後加入黃糖,醬油和蒜頭拌勻。喜歡的話這時可加入額外的新鮮辣椒以增添風味。放涼。
4. 當辣椒油變涼後,加入芝麻及芫荽拌勻,將醬汁淋在雞件上即成。


Sichuan Spicy Chicken

1 Free Range Chicken
10+ Chili Peppers (diced)
1 tsp Chinese Red Pepper
60ml Vegetable Oil
1tbsp Sesame Oil
1tsp Brown Sugar
3tbsp Soy Sauce
3 cloves Garlic (chopped)
1tbsp Sesame Seeds
1bunch Coriander (leaves only)

1. Steam the chicken for roughly 30 minutes until fully cooked. Let cool, debone and chop into mouthful pieces and serve on a plate.
2. Heat up a wok, add chili peppers, Chinese red pepper, vegetable oil and sesame oil. Cook over medium-low heat until it becomes chili oil. 
3. Turn off the heat and add brown sugar, soy sauce and garlic, stir well. Now you can add additional freshly diced chili pepper to it to enhance the flavor. Let cool.
4. When the chili oil is cooled down, stir in sesame seeds and corriander, mix well and pour on top of the chicken to serve. 


Tuesday, February 2, 2016

COOK - 韓國人參雞湯 Korean Ginseng Chicken Soup

這幾天又回復天寒地凍,孤零零一人餐最好就是做些一煲過又熱滕滕的菜式。 
韓國人參雞湯,暖胃又補氣啊!


《韓國人參雞湯》Korean Ginseng Chicken Soup

糯米  100g
雞  1隻
韓國新鮮人參 2條
蒜頭  6-7瓣
紅棗  5粒
水  800ml - 1L

100g Glutinous Rice
1 Whole Chicken 
2 Fresh Korean Ginseng
6-7 cloves Garlic
5 Red Dates
800ml - 1L Water


1. 糯米先用水浸泡2小時。隔水備用。
Soak the glutinous rice for 2 hours, drain.

2. 把雞洗淨,切去多餘的油脂,把頸部的皮疊起用牙籤插著封口。
Clean and discard excessive fat of chicken. Fold the skin near neck area and close the opening by pinching a toothpick. 

3. 將1支人參,3瓣蒜頭及3粒紅棗放入雞腔內,再倒入糯米。同樣地把雞皮疊起用牙籤插著封口。
Stuff 1 ginseng, 3 cloves garlic and 3 red dates into the chicken, then pour glutinous rice to fill the bird. Close the back side opening with the same method by piercing the skin with a toothpick. 

4. 把雞放入煲內,加入剩餘的人參,蒜頭和紅棗,注入清水至8成滿。以中火煲約1個半小時,如水份蒸發,中途可開蓋加水。
Place the chicken into the pot, add the remaining ginseng, garlic and red dates. Fill the pot with water until 80% full, boil over medium heat for 1 and a half hour. You can add more water midway if it gets evaporated.

5. 1個半小時後,雞湯應呈奶白色,把表面的油份撇去,加一茶匙鹽拌勻便成。
When it's cooked, the soup should be in milky color. Skim the fat on the surface and add 1 tsp of salt, stir well. Serve by cutting open the chicken and the meat should be very tender that it comes right off the bone. Enjoy the chicken, rice and soup all at once just like how the Koreans love it.


Monday, November 30, 2015

COOK - 栗子忌廉海鮮批 Seafood Pie in Chestnut Bechamel Sauce

通常去到些舊式老牌餐廳都很喜歡點焗酥皮湯,酥皮什麼什麼的,當還是小朋友的時候每每酥皮湯上桌時更會嘩嘩聲,覺得特別震憾!
適逢秋冬節氣,吃栗子正合時宜,便啟發了做這一道Crossover菜式。
一般的Bechamel Sauce 是用牛奶,牛油和麵粉製成,但因為我用栗子做底已可令醬汁有一點杰,所以我棄用牛油和面粉,改為用忌廉,牛奶,栗子和其他香料作醬汁。


栗子忌廉海鮮批  Seafood Pie in Chestnut Bechamel Sauce


栗子忌廉汁:
忌廉 120ml
牛奶  50ml
栗子  10粒 (去殼去衣)
原粒黑椒 1/2茶匙
紅洋蔥 1/4個 (或用2粒紅蔥頭代替)
意大利芫荽  2條
月桂葉 1片
海鹽  1茶匙

材料:
魚塊  1塊 (可用Halibut, Cod, Haddock,切成一口大少)
蝦  6隻 (去腸去殼留尾)
急凍廣島蠔  6隻
蛋  1隻 (打散)
急凍菠菜  少許 (解凍)
急凍酥皮  1塊

For the Chestnut Bechamel Sauce:
120ml Cream
50ml Milk
10 Chestnuts (deshelled)
1/2 tsp Whole Black Pepper
1/4 Red Onion (Or replaced by 2 shallots)
2 sprigs Italian Parsley
1 Bay Leaf
1 tsp Sea Salt

Other Ingredients:
1 Piece of Fish (Can be Halibut, Cod or Haddock,cut into mouthful pieces)
6 Shrimp (deveined, peeled, tails on)
6 Hiroshima Frozen Oysters
1 Egg (Beatened)
A Handful of Frozen Spinach (defrosted)
1 Frozen Puff Pastry

1. 在一湯鍋內放入栗子忌廉汁材料,以小火煮至栗子變軟。
Place the ingredients of the chesnut bechamel sauce in a stock pot, cook over low heat until chestnuts are softened.

2. 同時把魚沾上鹽及蛋汁,放入煎鍋煎香。
Meanwhile, season the fish pieces with salt and cover with the egg, pan fry till golden.

3. 利用手提攪拌器把醬汁打滑。
By using a hand blender, blend the sauce until smooth.

4. 將蝦及蠔放入醬汁內煮熟。
Place shrimp and oysters in the sauce, boil until cooked.

5. 煎好的魚塊放入18cm橢圓焗批盤內。
Place the fish pieces in an 18cm oval pie dish.

6. 再把醬汁連同蝦,蠔和菠菜倒入。
Pour the chestnut sauce together with the shrimp and oysters, add defrosted spinach.

7. 急凍酥皮放室溫5分鐘解凍,蓋在焗批盤上,按壓碗邊黏好,剪走多餘部份。
Place puff pastry in room temperature for 5 minutes to defrost. Cover on the pie dish, press onto the sides and trim.

8. 可隨意在酥皮上輕輕𠝹上花紋,再掃上蛋汁。
Brush the surface with egg mixture.

9. 放入已預熱180ºC 的Airfryer內,焗6分鐘至表面金黃。
Place the pie dish into Airfryer which has been preheated to 180ºC, bake for 6 minutes until puff pastry is golden.

10. 熱辣辣的栗子汁海鮮批完成。
A fluffy hot seafood pie in chestnut bechamel sauce is ready! 


Thursday, November 26, 2015

COOK - 鑄鐵鍋做温泉蛋 Making No-fail Onsen Tamago by Cast Iron Cocotte

蛋:是一樣簡單又複雜的食物。見過一本300多頁厚的書只教做蛋。
今次試用鑄鐵鍋做温泉蛋,1 Take OK,零失敗!

§ 但記住一定要跟足指示用18cm 鑄鐵鍋和註明的特定水量及步驟,要不是不成功不要賴我啊!有朋友就是用了比較大的鍋,然後水未能完全蓋過蛋而不成功,那是不行的噢!


鑄鐵鍋做温泉蛋 (18cm)

蛋 2隻
900ml 水
300ml 冷水

1. 2隻蛋放至室溫。
2. 900ml水放入一 18cm 鑄鐵鍋,用中火燒熱至微微冒煙,水中出現小泡泡。關火。


3. 將300ml 冷水加入鍋中,拌勻令水溫變得一致。
4. 小心放入2隻蛋,輕輕攪拌水使下了蛋的水水溫維持一致。加上鍋蓋。

5. 讓蛋在鍋內靜置15分鐘。取出蛋放在冷水下沖至蛋回愎室溫。
6. 如常地打蛋,出來便是美味的滑滑溫泉蛋。


Making No-fail Onsen Tamago by Cast Iron Cocotte (18cm)

This no-fail method can make you perfect onsen tamagoes by using an cast iron pot

2 Eggs
900ml Water
300ml Cold Water

1. Take 2 eggs back in room temperature
2. In a 18cm pot, fill with 900ml water, over medium heat, cook until small bubbles form, turn off heat
3. Add 300ml cold water to the pot, stir well to make sure the water temperature is uniform. (about 70ºC)
4. Carefully add the 2 eggs, stir the water a bit, cover with lid.
5. Let the eggs stay in the pot for 15 minutes, then take out and rinse in cold water until shells are back in room temperature.
6. Crack the eggs and there is your perfect onsen tamago.


Saturday, November 21, 2015

COOK - 自創沖縄苦瓜沙律 Okinawa Bitter Gourd Salad

我知,我知,很多人不吃苦瓜因為它苦,甚至有個朋友不吃苦瓜的原因是因為不喜歡它的名字,真是無辜的苦瓜喔。
我本來沒有特別喜歡吃苦瓜,可是自吃過沖繩的特產品種後,變便得愛吃了。沖繩的呈深綠色,表面的粒粒很細小,味不太濃,清爽帶微微甘苦,生吃也可以。
在超市看到有賣,立刻買下來,但又不想這麼沉悶老是吃沖繩苦瓜豆腐炒蛋,便自創起這個沙律來,入口立刻能帶給你清爽飽足但又很健康的感覺(減肥中人仕自我感覺良好中),況且又能排毒美顏,吃得苦中苦。。。。。嘛!


自創沖縄苦瓜沙律 (沖縄ゴーヤサラダ)

沖縄苦瓜 1條 (切半,去耔,切薄片)
水浸吞拿魚 1罐 (80g,隔去水份) 
1/4 紅洋蔥 (切極薄片)
1條醋醃小黃瓜 (切碎)
4粒車喱茄 (切半)
海鹽
鮮磨黑胡椒
鰹魚碎


1. 將鹽灑在苦瓜片上並拌勻,靜置10分鐘。(此舉可帶走苦味)
2. 在一小碗內,放入鹽水浸泡紅洋蔥片直至變半透明,隔水備用。
3. 在一小鍋內煲滾水,加入苦瓜煮至浮起並呈翠綠色,約5分鐘。立刻隔水放入一盤冰水內降溫,隔水備用。


4. 最後將所有材料混合在一起,以海鹽和黑胡椒調味,加上鰹魚碎作裝飾及提味便成。這樣便能品嘗到清新爽又不苦的苦瓜了!


Bitter Gourd Tuna Salad

1 Bitter Gourd (halved, deseeded and thinly sliced)
1 Can Tuna (80g, drained)
¼ Red Onion (thinly sliced)
1 Gherkin (finely diced)
4 Cherry Tomatoes (halved)
Salt
Ground Pepper
Bonito Flakes

1. Massage the sliced bitter gourd with salt and let sit for 10 minutes.
2. In a small bowl, melt salt with water and add red onion to soak until become translucent. Drain.
3. In a pot of boiling water, add bitter gourds and cook until they flow, about 5 minutes. Immediately drain and soak in ice water. Drain after cool down.

4. In a serving bowl, mix bitter gourd, tuna, red onion, gherkin and cherry tomatoes. Season with salt and pepper and garnish with bonito flakes to serve.


Friday, October 30, 2015

COOK - Halloween "Eat your vegetables" 好味又驚嚇企劃

哈囉喂!!Halloween 就到了,大家扮鬼扮馬之時,我都給自己做了一個Lo-Fi,好味又驚嚇的project叫"eat your vegetables",提提你多吃蔬菜!。
第一波:恐怖又香滑的“椰奶南瓜湯” 食譜按這裡
While you're figuring out what costume to wear on Halloween, I've given myself a little "scarily healthy" project to bring your awareness to eat more vegetables!! Today's special: Coconut Milk Pumpkin Soup. Click here for recipe.


識得笑其實好好笑!
"Eat your vegetables"企劃第二波!我一向都覺得椰菜花好似電咗髪嘅“阿婆頭”,依家阿婆唔止電髪,仲染埋髪添!今個Halloween,你都咬吓阿婆個頭啦啦啦!
"Eat your vegetables" series #2 - I always think that cauliflower looks like a granny perm, and now they even come in different colors. Watch out and not to be mistaken and bite your grandma's head on Halloween ~~~


係咪嫌之前的不夠驚嚇?好啦,嗱,唔好暈啊!
"Eat your vegetables"企劃第三波!動用了各地搜羅的道具,製作了這個lo-fi的圖片。
覺得血恐怖嗎?我就覺得病比血更恐怖,記得多吃有營養的蔬菜噢,就好像這個紅菜頭汁一樣,很健康啊!Happy Halloween!
"Eat your vegetables" series #3 - The above are not scary enough?? oh well, please don't faint on this one...
Remember to eat more healthy vegetables, they might be scary, but scarily healthy!
Happy Halloween ~~~


Thursday, October 29, 2015

COOK - 椰奶南瓜湯 Coconut Milk Pumpkin Soup

舊湯新做!

即是我常常都說,同一種菜式不必每次都用同一方法去做,可試多一點variations,改一改,加點變化又可變成新口味!今次用上椰奶,湯的材料更簡單,但多了一點香滑,口感濃一點。(看回忌廉南瓜湯做法可按這裡)
趁著萬聖節快到,扮鬼扮馬之餘,口味上也應應節吧!


椰奶南瓜湯 (2-3人份)

洋蔥 1/2個 (切小粒)
南瓜 去皮去耔後~300g (切小粒)
海鹽 1/2茶匙
忌廉 200ml
椰奶 400ml
百里香 1條
南瓜耔 少許(裝飾用)

1. 湯鍋內加入少許橄欖油,將洋蔥粒炒香,放入南瓜粒和鹽同炒2分鐘。
2. 加入忌廉和奶入鍋內煮滾。放入百里香和迷迭香葉用中小火煮約15分鐘。
3. 當南瓜煮至變軟便用手提攪拌機內打至變滑煮滾。

4. 最後加入鹽調味,放入湯碗內再灑上南瓜耔或額外的椰奶作裝飾。

Happy Halloween~~~


Coconut Milk Pumpkin Soup (Serves 2)

1/2 Onion (minced)
300g Pumpkin after peeled (deseeded, diced)
1/2 tsp Sea Salt
200ml Cream
400ml Coconut Milk
1 stalk Thyme
Pumpkin Seeds for garnish

1. Add a little olive oil in a stock pot, fry the onion until golden, add diced pumpkin and salt and stir fry for 2 minutes. 
2. Add cream and coconut milk and bring to a boil. Then add the leaves of thyme and simmer for 15 minutes. 
3. Once the pumpkins are cooked and soft, blend the soup with a hand blender until smooth. Bring to a boil.
4. Adjust seasoning with salt, serve on a soup plate/bowl, garnish with pumpkin seeds and extra coconut milk.